Showing posts with label HOW TO TIPS. Show all posts

10 December 2014

Where to find Mac OS X Yosemite's full-screen button

No longer is the full-screen button located in the upper-right corner of your screen in OS X. Learn how to enter full-screen mode in Mac OS X 10.10 Yosemite.

The full-screen button for applications in Mac OS X has moved. You will no longer find it located in the upper-right corner of an application window. Yosemite has appropriated the green maximize button found next to the red close button and yellow minimize button and now uses it as the full-screen button.


When you mouse over it, you'll notice two outward-facing triangles have replaced the familiar "+" icon of the old maximize button. Press the green button to enter full-screen mode.

To exit full-screen mode, move your cursor to the top edge of the screen. This makes visible the menu bar along with the green full-screen button and red close button. Press the green button to exit out of full-screen.

In some apps however, such as Chrome, the full-screen button remains visible in full-screen mode, regardless of where your cursor is.

Before you bemoan the missing maximize button, allow me to tell you that it's still there -- just hidden a bit. Hold down the Option key and mouse over the green full-screen button and you'll see the familiar "+" icon. That's right, Option-click gives you the old maximize functionality.

Three tips for using iTunes 12

If you miss some of the old comforts of Tunes 11, learn how to get reacquainted with the sidebar, library view and the old Get Info window.

OS X 10.10 Yosemite introduced iTunes 12 and an entirely new look and feel of Apple's sprawling hub for managing a variety of media along with your iOS devices. If you use iTunes for its original pursuit of listening to music, then perhaps you have bemoaned the flattened, simplified design that has removed or obscured a few of your favorite features, namely the sidebar and library view, the old Get Info window, and the old method of activating the iTunes miniplayer. Let's jump in.

Searching for the sidebar

iTunes 12 boasts a clean design that places an emphasis on album art. If you like to flip through your vinyl collection, you may enjoy perusing your music library by album cover. If you leaned heavily on the sidebar in the left panel of iTunes 11, however, then you may feel lost.

The default view of iTunes 12 is the My Music tab sorted by Albums. To resurrect the sidebar, select the Playlists tab at the top, which opens your playlists in the sidebar while giving you the same Albums view in the right panel.

To swap out the album art for the text-based library view that lists the song in your music library, click on the Albums drop-down menu in the upper-right corner and select Songs.

And as a bonus, you can add back the Column Browser above your list of songs that lets you quickly browse by genre, artist or album. I use it constantly because I like to filter by genre, and lord knows I love a genre shuffle. When you are in the Songs view in either the My Music of Playlists tab, go to the View menu at the top of your screen and choose Column Browser > Show Column Browser (or hit Command-B).

Get the old Get Info window

If you are a careful curator of your music library, then you use the Get Info window constantly to adjust the data as you import music, tweaking the genre, song titles, track info, and so on. It's also useful to import album art via drag and drop. The Get Info window of iTunes 12 is entirely different. Gone are the easily identified editable fields and small Artwork box where you could drag and drop album art.


Though it's not obvious, the new Get Info window still lets you edit the same fields. And if you select the Artwork tab, you can drag album art to the blank space in the window for albums in your library that lack art. If you aren't growing accustomed to the new layout of the Get Info window, just hold down the Option key on your Mac when choosing File > Get Info. (Sadly, it doesn't work when you hold down Option and use the keyboard shortcut Command-I to open the Get Info window.)

Managing the miniplayer

The button to access the iTunes miniplayer has moved and is now in the playback control area at the top center of iTunes. Click the thumbnail of the album currently playing to switch to the miniplayer (or press Command-Shift-M). Alternatively, to open the miniplayer while still keeping open the large window of iTunes, hold down the Option key when clicking the album thumbnail (or press Command-Option-M).

Make Safari show the full address for Websites

If you want or need to see more than a Web page's domain name in Safari, there is an easy fix.

OS X Yosemite introduced Safari 8 and a flatter, more streamlined design. Jason Cipriani offered four tips for Safari 8 last month, and I have a quick fifth tip for you.

safari-8-yosemite-show-full-address.jpg

As part of its embrace of sleek simplicity, Safari 8 does not by default show the full Web address for Web pages in its address bar. Instead, is shows only the domain name. If this lack of information bothers you or disrupts your workflow, there is an easy fix.

1. Go to Safari > Preferences (or press Command-comma).

2. Click on the Advanced tab and check the box at the top for Show full website address.

3. Close Preferences and go about your business.

Even without this change in preferences, you can see a Web page's full URL by clicking into Safari's address bar, which highlights the page's address and shows it in full.

Install Chrome 39 for OS X for 64-bit Web browsing

As long as your Mac isn't ancient, you can make the move to 64-bit Chrome. Learn how to download it and find out if your Mac has 64-bit support.

Google yesterday released its first 64-bit browser for OS X with Chrome 39. (For those scoring at home, specifically it's version 39.0.2171.65.) In addition to the usual security fixes, the latest version of Chrome promises improved stability and performance over its 32-bit predecessor.

Chrome 39 will arrive via automatic updates if you have such things enabled. If not, you can download it directly from Google. After downloading the file and closing Chrome, drag the file to the Applications folder and replace the older item named Google Chrome.

Lastly, you will need a Mac with a 64-bit processor to run Chrome 39. It's likely you have a Mac with 64-bit support; Apple started making the switch to 64-bit processors in 2006. To check to see if your Mac has a 64-bit processor, click the Apple button in the upper-right corner and choose About This Mac. Your processor is listed on the Overview page. Check your processor against the chart on this Apple support page.

How to record your webcam with VLC

Whether you want to make a few YouTube videos, or you're practicing a speech, recording yourself with VLC is easy and offers lots of formatting options.

The provided software for some webcams can be a bit lackluster. While options for adjusting the brightness, contrast, or zoom exist, you may be looking for a way to record the feed. If you're already using VLC for watching videos or streaming podcasts, did you know you can also use it to record your webcam?

Don't have VLC yet but want to try it out? Grab a copy here.

The recording function in VLC can be turned on and off at will, or switched to a set and forget mode. This allows you to use the feature for a number of purposes, including studying your own abilities on camera, setting up a temporary security feed (hard drive space allowing), or just making a video for the Web. Check out these steps for recording video from your webcam:


Step 1: Head to Media > Open Capture Device and then adjust the following settings:

Capture Mode: DirectShow

Video device name: Select your webcam name.

Audio device name: Choose your microphone. This can be the one built into your webcam, a mic on a headset, or another free-standing mic you want to use.


Step 2: Click Advanced options and then adjust the Video input frame rate to 30 (a lower value will yield lower quality video). If you want to stick with the software settings for your webcam, then check the box next to Device properties.

Step 3: Pick one of these two recording methods:

Live feed: You can choose to view the video as you're making it, which will require you to wear a headset to avoid audio feedback. Additionally, you'll need to click the Record button when you want to capture the feed, which will be saved in MP4 format in your VLC directory. Click Play at the bottom of the window to start this method. Missing the record button? You can enable it by going to View > Advanced Controls.

Direct save: If you don't want to wear headphones, and you're confident that your webcam is at the correct angle to capture what you want, then you may opt for this method of recording. When you're finished, press the stop button and the entire video will be saved. Click the arrow next to Play and select Convert to start this method. You can change the video format if you do not prefer MP4, and then you can click Browse to select a location and give the file a name to make it easier to find.
Once you're finished creating your videos, you can share them, or keep them private if you are examining your speech or video abilities.

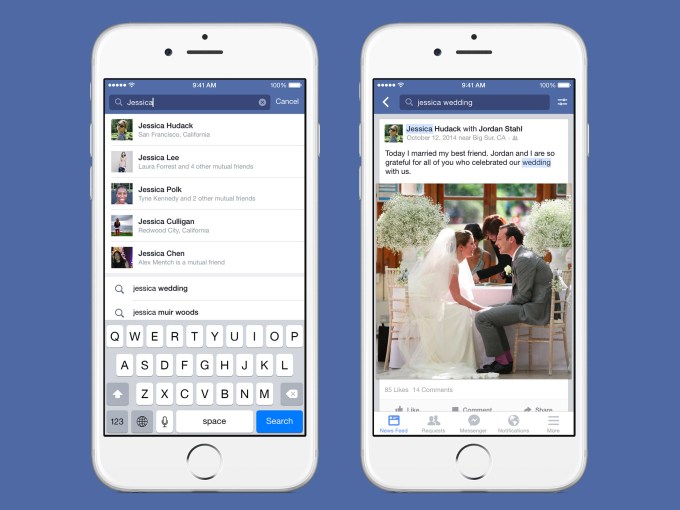
Facebook Brings Graph Search To Mobile And Lets You Find Feed Posts By Keyword


fb-keywordsearch2


FacebookSearch2


FullSizeRender


Screen Shot 2014-12-08 at 10.12.58 AM

Facebook Location Search

Buyer's guide: Best printers for home use under Rs 7,000

I 'm considering a printer for home use, within a budget of Rs.7,000, that will primarily be used for B&W documents, invoices, bills, and the odd airline tickets. Kindly advise.

Bhavik Mehta, Mohit Ahuja Naren Sharma, Vijay Parab

Given your printing needs, we would recommend laser printers over inkjet machines. These are capable of outputting sharper fonts; the laser toner doesn't smudge in case you accidentally spill water on your printed sheets; and you get more professional-looking prints.

Also, while laser toners might cost four times more than an inkjet cartridge, you'll get 10 times the output - around 2,000 prints per toner when compared to inkjet printers' 200 prints per cartridge. So if your printing needs exceed 1,500 pages per year, then laser printers are definitely more economical.

Additionally, when it comes to bulk printing, laser printers are capable of speeds that are at least 50% faster than inkjet printers. Here, you can opt for:

*HP LaserJet Pro P1108 (Rs 5,500) — Print speed: 18 ppm; First Print Out Time (FPOT): 8.5 seconds

*Canon Laser Shot LBP6018B (Rs 5,800) — Print Speed: 18 ppm; FPOT: 7.8 seconds

Both these printers connect to your PC via a USB port. If you're looking for a bit more in connectivity, you could consider:

*Brother HL-1211W (Rs 6,440) — Print Speed: 20 ppm; FPOT: 10seconds

Besides USB connectivity, this printer lets you take prints wirelessly from your AndroidiOS smartphone or tablet, via its iPrint & Scan app. All the printers listed above are capable of up to A4-size prints and are equipped with an input tray capacity of 150 pages.

*Samsung SCX 3401XIP (Rs 7,500) — Print Speed: 20 ppm; FPOT: 8.5 seconds

If you can up your budget a bit, this machine is not only a printer, but you also get a photocopier and scanner. It has an optical scanning resolution of 600x600dpi that's more than enough for high resolution printing needs, while its copier can be set to output up to 99 pages at once.

Before you buy, we recommend you check with your local dealer for availability and cost of toner cartridges. Also, check if the printer meets all your other printing needs, whether envelopes, transparencies, labels, cardstock and postcards.

Stop missing updates from friends on Facebook

Instead of scrolling through your entire Facebook timeline for updates from your closest friends or family, try using this list instead.


If you have a lot of friends on your Facebook profile, then you know how crazy it can get when trying to keep up with everyone's status updates. You may have tried using the Most Recent mode for your timeline, but the posts you want to read get lost in a sea of game updates and location check-ins.

To keep track of the most important updates, you should add people to your Close Friends list. The main reason for using this list provided by Facebook, instead of making your own, is notifications. You can also adjust the types of notifications you receive for people on the list. Ready to get started? Here's how:


Step 1: Open the Facebook list management page, then click on Close Friends.


Step 2: When the list page displays, click the Manage List button and then choose Edit List.

Step 3: In the pop-up window, click the drop-down menu labeled On This List and select Friends. Now you can click on the pictures of friends you want on the list, or search by name. Click Finish.

Step 4:Click the Manage List button, then click Choose Update Types. The menu will load a list of update types; make sure there are checkmarks next to the updates you want to receive. For instance, you may want to remove Game updates -- unless you like them.

Now you'll have no need to scroll through your feed, making sure you didn't miss updates from the people you are closest to. Additionally, you will get notifications on your smartphone or via email for each update (like you would when someone replies to your posts).

9 December 2014

How to make the most money from old gadgets

Selling old electronics doesn't need to be a hassle if your end game is making the most cash.

The bad news first: if you want the absolute best price possible, shop around and compare deals. Don't rely on one source, because a better deal may be waiting around the corner.

The good news? With a few tips, that sweet cash return can help subsidise your new devices.

Before you start

  • Make it appealing: Find the original box and chargers if you still have them, do a factory reset and wipe all your personal data so the gadget looks like it's fresh out of the box. Physically clean devices like cameras and PCs so they look as good as new.
  • Trade-in: As long as your device is in good working order, trading rather than selling directly can lead to bigger discounts, especially if you end up with gift cards that can offset the cost of a new device
  • Time it right: When a new iPhone is launched, the market is flooded with older generation models. Work out release cycles for the product you're selling and try and time it so you are ahead of the curve, not swimming in the deluge. If in doubt, sell it sooner rather than later.
  • Research what it's worth: Do a little online detective work before selling to determine how much you can get. On eBay, look for completed listings to get an idea of market price. Go to eBay Advanced Search and tick "Completed listings".
  • Check the warranty: Potential buyers will want to know if the device is still covered under a warranty in case something goes wrong.
  • Beware of scams: If a deal seems too good to be true, it might be. Keep a record of your transaction and read up on seller protection if using a direct sale method.